It is always fun when my interests overlap, and such is the case with the AWS Tile Generator that I would like to share with you today.
Beyond the tiles themselves, I spent some time thinking about how cool it is that so many different moving parts (as my friend Gary Gordon likes to say) came together to make this happen. This includes both hardware and software, and is a testament to the power and value of published, open data formats and open source software.
Tile Generator
Created by my colleague Wayne Stallwood, the generator takes the AWS Icon Assets (a ZIP file that contains a bunch of icons in SVG format), uses a Python script to unzip and preprocess each of the icons in the file, and then uses OpenSCAD to turn each SVG-formatted icon into an STL file suitable for 3D printing. Wayne also included a samples directory with STL files for some of the most common AWS services.
The printed tiles look amazing and I can think of all sorts of fun uses for them:

Deep Inside
The STL files are effectively of infinite resolution, so I can print the tiles in any size that I want.
An STL file defines the shape of an object to be printed, but it does not actually tell the printer how to move from place to place or layer to layer. The instructions needed to do this (formally known as G-code) are different for each make and model of printer. In addition, there are a lot of options to choose from when printing. These include the size (diameter) and type of filament, the thickness of each layer (thinner layers can represent more detail but make the print take longer), and then the overall density of the object.
While it is certainly possible to print solid objects, this is time-consuming and overkill in most cases. Instead, the exterior walls are fully printed, and the interior is only partially filled. This interior fill is called infill, and there are plenty of options to choose from.
The program that accepts an STL file (or another device-independent representation of a 3D object) and turns it into G-code is called a slicer. I use the open source PrusaSlicer, but there are many others, both commercial and open source to choose from.
PrusaSlicer has 3 operating modes (Simple, Advanced, and Expert). The Advanced and Expert modes offer increasing degrees of control, and become more useful as you gain experience with 3D printing. This can be somewhat daunting at first glance:

Truth be told, all of these choices scared me away from 3D printing for a while, and it took me some time to become comfortable knowing what choices to make and what knobs to turn. Fortunately, help (with lucid explanations) is just a click away from within PrusaSlicer.
The bottom line here: when someone says “just 3D print it” and implies that it is trivial, you can be sure that they have never done so themselves — there are lots of knobs to turn and lots of choices to make.
Slice and Dice
As you can see, I printed my tiles using two different colors of filament. This is a relatively simple 3D printing trick, but let’s take a deeper look anyway.
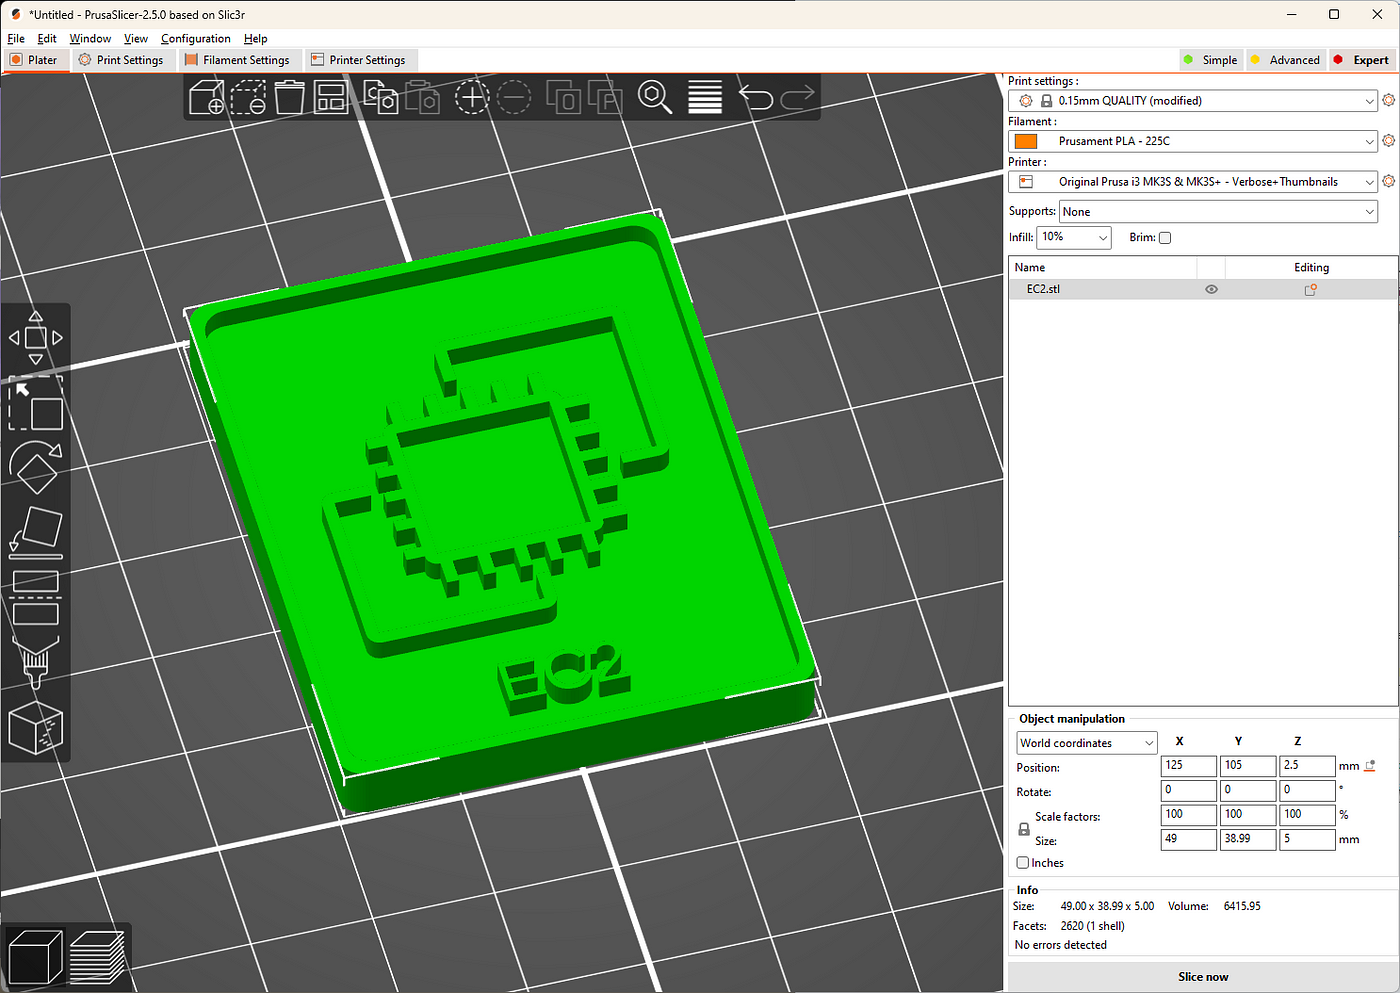
I create a fresh PrusaSlicer session and import an STL file to get started (I can work on more than one at a time, but let’s keep it simple):
Then I click Slice now, and PrusaSlicer does its thing. It actually detects objects that look like signs or logos, and offers to apply a color change automatically:
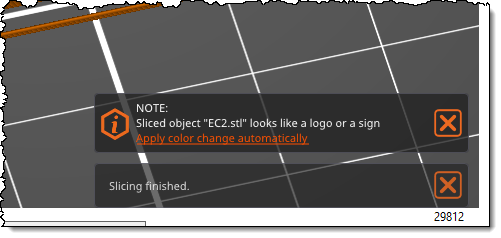
I click Apply color change automatically, and PrusaSlicer does that. It even shows me where the color change will take effect:
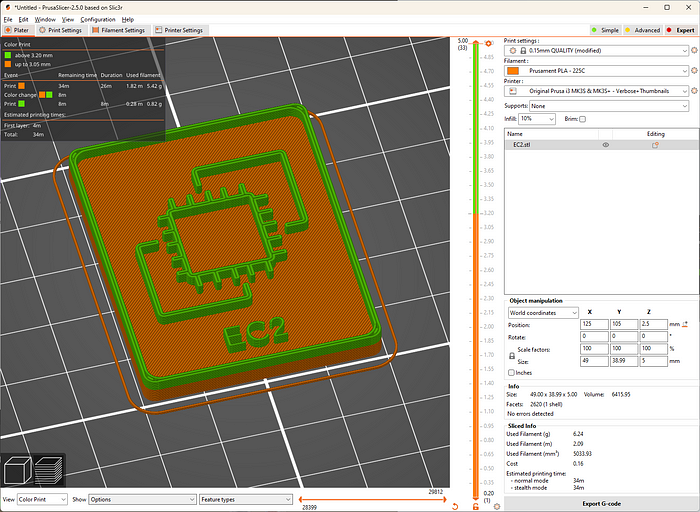
If PrusaSlicer did not have this feature or if I wanted to do something fancier, I would use the vertical bar (green and orange above) to specify any desired color changes.
When PrusaSlicer generates the G-code file, it inserts a “change filament” instruction. Then, when my printer (a Prusa i3 MK3S+) sees this instruction, it pauses, beeps, and walks me through the steps of unloading the current filament and loading the new one. One important note: The G-code doesn’t actually include any information about filament colors. If you look closely at the previous screen shot, you can see that PrusaSlicer tells me how long it will take to print each color.
To the Printer!
I save the G-code, and now I need to get it to the printer!
The first way to do this is by copying the file to an SD card, hand-carrying it to the printer, and then using the printer’s control panel to find the file and print it. This is a perfectly adequate starting point, but it gets tedious after a while.
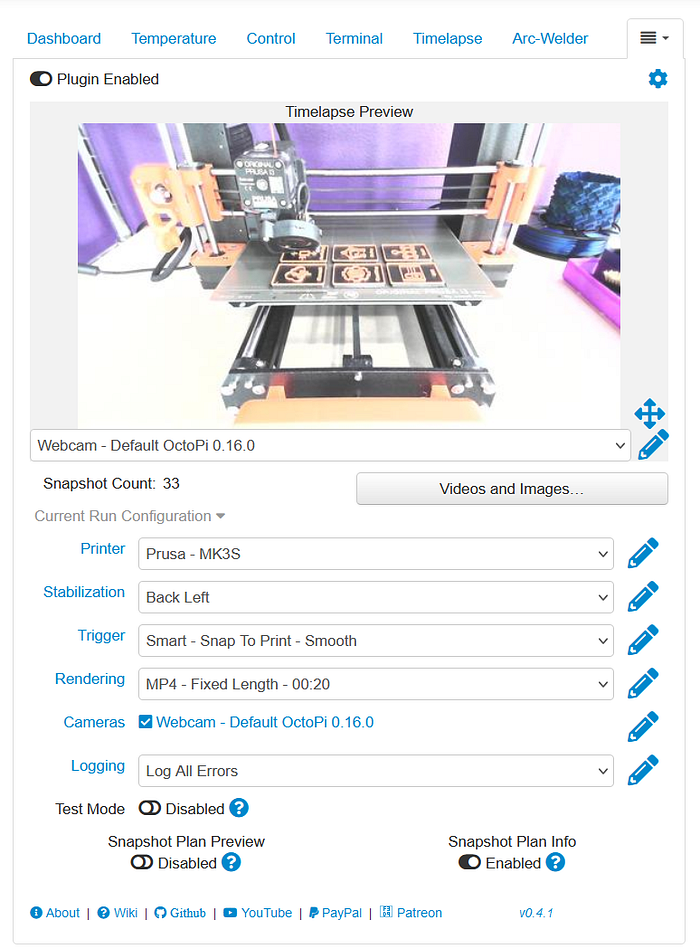
To make things easier, I connected a Raspberry Pi to the printer and installed the open source OctoPrint web application. Instead of using an SD card, I simply upload (over Wifi) the file to OctoPrint, select it, and click the Print icon:

OctoPrint is modular and has a ton of interesting plugins, along with a very strong user community! One of my favorite plugins is OctoLapse, which takes high-quality time lapses of the printing process, again with tons of options to explore:
I am still fine-tuning my camera and my lighting; here’s a somewhat lame time lapse (my fault). There’s no visible motion here because I have configured OctoLapse to pause before it takes each photo:
To add one more element, I can also monitor the printing process from my phone using OctoApp. My OctoPrint installation is on a private IP address that is reachable only from within my home network. If I wanted to monitor my printer from afar, I could follow the steps in this video to create a secure remote connection from my phone to my printer using Tailscale.
My Printing Station
To wrap things up, here’s a picture of my printing station:

The End
I didn’t set out to document my 3D printing setup or to introduce you to slicing, but that’s what happens when you just start writing! Leave me a note if you read this to the end and if you find this post useful.